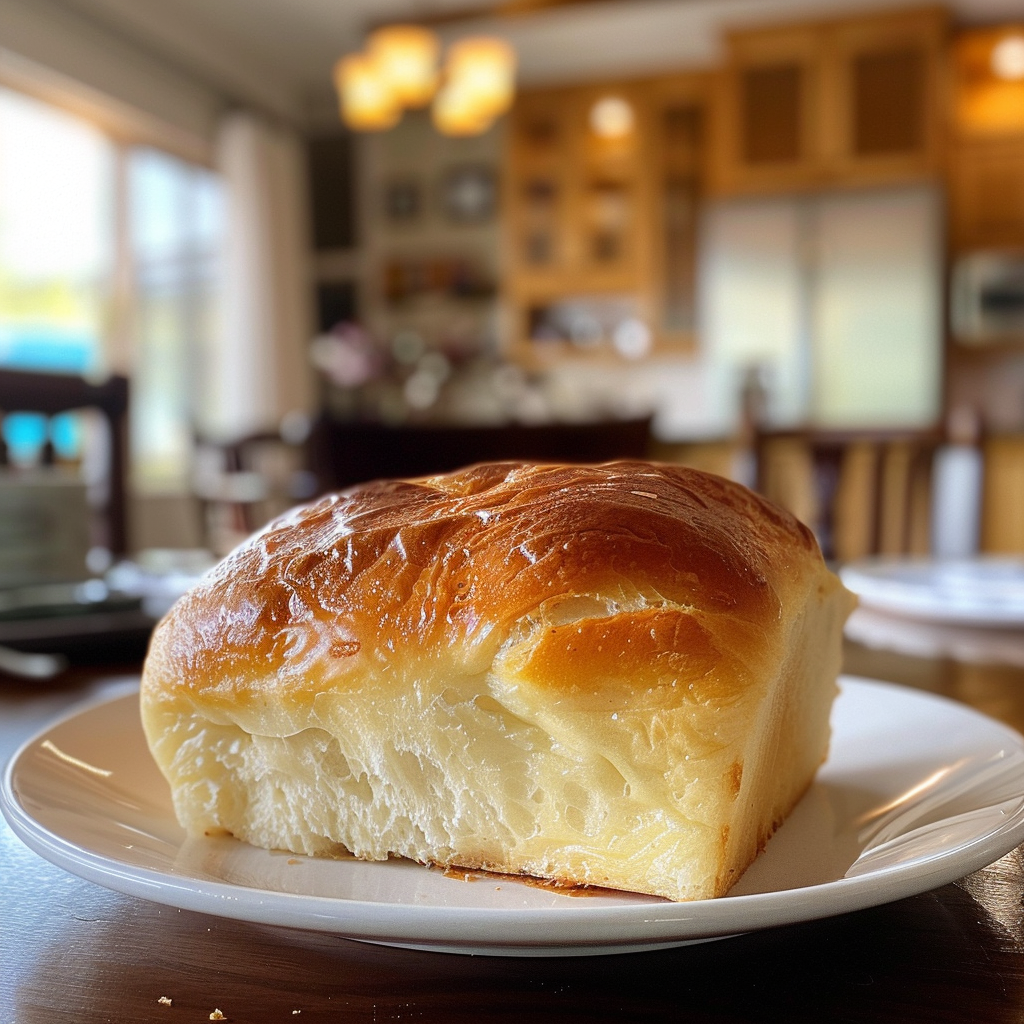
Heavenly Japanese Milk Bread Recipe You Must Try Today is not just a title, it’s a call to action! Imagine sinking your teeth into a soft, pillowy slice of bread that practically melts in your mouth. The aroma wafts through the air, tempting even the most disciplined dieters to take just one more slice. This is not your average bread; this is the kind of bread that can turn breakfast into a five-star dining experience and make sandwiches feel like gourmet creations.
Jump to:
- <strong>Essential Ingredients</strong>
- <strong>Let’s Make it Together</strong>
- <strong>Prepare Your Dough Ingredients</strong>
- <strong>Mix Dry Ingredients </strong>
- <strong>Add Wet Ingredients </strong>
- <strong>Knead Like You Mean It </strong>
- <strong>First Rise: Let It Chill Out </strong>
- <strong>Punch Down & Shape Your Dough </strong>
- <strong>Second Rise: Patience Is Key </strong>
- <strong>Bake That Beautiful Loaf </strong>
- <strong>Cool & Slice </strong>
- <strong>Perfecting the Cooking Process</strong>
- <strong>Add Your Touch</strong>
- <strong>Storing & Reheating</strong>
- <strong>FAQ</strong>
- What makes Japanese milk bread different from regular bread?
- Can I use whole wheat flour instead of all-purpose flour?
- How do I know when my dough has risen enough?
- 📖 Recipe Card
Growing up, I remember my grandmother baking loaves of fluffy milk bread that would disappear faster than you could say “carb loading.” Every slice was a warm hug, and I still get giddy thinking about those Sunday mornings filled with laughter and the delightful scent of freshly baked bread. Whether it’s for breakfast, an afternoon snack, or that midnight craving (we all have them), this Heavenly Japanese Milk Bread Recipe You Must Try Today promises to be an unforgettable addition to your culinary repertoire. For more inspiration, check out this cooking tips for baking recipe.
Why You'll Love This Recipe
- This Heavenly Japanese Milk Bread is incredibly easy to prepare and requires minimal ingredients
- Its delicate flavor profile makes it perfect for both sweet and savory dishes
- The loaf’s beautiful golden crust and fluffy interior will impress anyone lucky enough to have a slice
- It’s versatile enough to serve as toast for breakfast or as a base for gourmet sandwiches
I remember making this bread for my family one weekend, and their delighted faces were priceless!
Essential Ingredients
Here’s what you’ll need to make this delicious dish:
- All-Purpose Flour: Use high-quality flour for the best texture; it’s the backbone of this bread.
- Milk: Full-fat milk provides richness; opt for fresh milk for creaminess.
- Yeast: Instant yeast works wonders here; there’s no need to proof it first.
- Sugar: A touch of sugar enhances flavor and activates the yeast beautifully.
- Salt: Essential for flavor; don’t skimp on it!
- Butter: Unsalted butter adds richness; make sure it’s softened before use.
- Eggs: Eggs enrich the dough, giving it structure and flavor; use large eggs for consistency.
The full ingredients list, including measurements, is provided in the recipe card directly below.
Let’s Make it Together
Prepare Your Dough Ingredients
Gather all your ingredients on a clean countertop. Measure precisely as baking is an exact science. You want everything ready because things will move quickly once you start mixing.
Mix Dry Ingredients
In a large bowl, combine all-purpose flour, instant yeast, sugar, and salt. Whisk until well-blended. The aromas will be enticing! Ensure there are no lumps because nobody likes surprise pockets of flour in their bread.
Add Wet Ingredients
Pour in the warm milk followed by softened butter and eggs into your dry mixture. Use a spatula or wooden spoon to mix until you see no dry flour left. It should look slightly shaggy but will come together beautifully!
Knead Like You Mean It
Transfer the dough onto a lightly floured surface. Knead for about 10 minutes until smooth and elastic. Don’t rush this step; you want that gluten developed! It should feel soft yet springy under your hands—like a stress ball but way tastier.
First Rise: Let It Chill Out
Place your kneaded dough in an oiled bowl and cover with plastic wrap or a damp cloth. Let it rise in a warm spot until it’s doubled in size—about 1-2 hours is ideal. Use this time wisely; perhaps make yourself a cup of tea or scroll through cute cat videos online.
Punch Down & Shape Your Dough
Once risen, punch down the dough gently (yes, liberate some frustration) then transfer it back onto the counter. Shape it into a log that fits snugly in your loaf pan. It should be plump like it’s been hitting the gym!
Second Rise: Patience Is Key
Cover the loaf with a cloth again and let it rise until nearly doubled—this usually takes about 30-45 minutes. Preheat your oven to 350°F (175°C) during this time so it’s nice and hot when you’re ready to bake.
Bake That Beautiful Loaf
Slide your loaf into the preheated oven and bake for 30-35 minutes until golden brown on top. The smell wafting through your home will be heavenly—get ready for compliments!
Cool & Slice
Once baked, remove from oven and let cool in the pan for about 10 minutes before transferring to a wire rack. Wait patiently (if you can) before slicing so you don’t squish that lovely texture!
This Heavenly Japanese Milk Bread Recipe You Must Try Today isn’t just about creating food; it’s about crafting memories—one soft slice at a time! Enjoy every bite with butter or jam or simply on its own!
You Must Know
- The Heavenly Japanese Milk Bread Recipe is soft and fluffy, perfect for sandwiches or toast
- The secret is in the tangzhong method, which keeps the bread moist for days
- This dish will impress family and friends with its delicate sweetness and airy texture
Perfecting the Cooking Process
Start by preparing the tangzhong: cook flour and water until thick before mixing with other ingredients. This sequence ensures your bread is fluffy and light.

Add Your Touch
Feel free to add flavors like matcha, chocolate, or even a hint of orange zest to elevate the taste. Customizing can make this recipe uniquely yours.
Storing & Reheating
Store bread in an airtight container at room temperature for up to four days. To reheat, pop slices in a toaster or wrap in foil and warm in the oven.
Chef's Helpful Tips
- Keep your ingredients at room temperature for better mixing
- Always measure flour accurately; too much can lead to dense bread
- Don’t skip the resting times; they are crucial for developing flavor and texture
I once baked this heavenly bread for a family gathering, and it vanished within minutes. Everyone was raving about how soft and delicious it was, leaving me feeling like a baking rockstar! For more inspiration, check out this more delicious recipes recipe.
FAQ
What makes Japanese milk bread different from regular bread?
Japanese milk bread uses tangzhong for an incredibly soft texture that’s hard to beat.
Can I use whole wheat flour instead of all-purpose flour?
Yes, but it may change the texture; consider using a mix for best results.
How do I know when my dough has risen enough?
The dough should double in size; gently poke it, and if it springs back slowly, it’s ready!
Did You Enjoy Making This Recipe? Please rate this recipe with ⭐⭐⭐⭐⭐ or leave a comment.
📖 Recipe Card
PrintHeavenly Japanese Milk Bread Recipe You Must Try Today
- Total Time: 55 minutes
- Yield: Approximately 12 servings 1x
Description
Heavenly Japanese Milk Bread is a must-try recipe that delivers a soft, pillowy loaf with a golden crust. Ideal for breakfast, sandwiches, or sweet treats, this versatile bread will elevate any meal. With minimal ingredients and an easy preparation process, you’ll find yourself reaching for this delightful recipe time and again. Experience the nostalgia of homemade bread with each delicious slice!
Ingredients
- 3 cups all-purpose flour (360g)
- 1/2 cup whole milk (120ml), warmed
- 2 tsp instant yeast (7g)
- 2 tbsp granulated sugar (25g)
- 1 tsp salt (5g)
- 4 tbsp unsalted butter (56g), softened
- 2 large eggs
Instructions
- In a large bowl, whisk together flour, yeast, sugar, and salt until well combined.
- Add warm milk, softened butter, and eggs to the dry mixture. Stir until no dry flour remains.
- Knead the dough on a floured surface for about 10 minutes until smooth and elastic.
- Place the kneaded dough in an oiled bowl, cover it, and let it rise in a warm spot until doubled in size (1-2 hours).
- Punch down the risen dough and shape it into a log for your loaf pan.
- Allow it to rise again until nearly doubled (30-45 minutes) while preheating your oven to 350°F (175°C).
- Bake for 30-35 minutes until golden brown on top.
- Cool in the pan for 10 minutes before transferring to a wire rack.
- Prep Time: 20 minutes
- Cook Time: 35 minutes
- Category: Bread
- Method: Baking
- Cuisine: Japanese
Nutrition
- Serving Size: 1 serving
- Calories: 130
- Sugar: 2g
- Sodium: 150mg
- Fat: 4g
- Saturated Fat: 2g
- Unsaturated Fat: 1g
- Trans Fat: 0g
- Carbohydrates: 21g
- Fiber: 1g
- Protein: 4g
- Cholesterol: 40mg